
by Ziv Haparnas
Film cameras are becoming rare. Although digital cameras have come a long way since they were first introduced there are still photographers that prefer to use old film cameras. Some of them use film exclusively while others prefer film for specific scenarios.
There is no simple answer to the question which camera is better, film or digital. In some scenarios film is better than digital and in other scenarios digital is better than film. They both have advantages and disadvantages and the true answer to which is better is simply a list of differences. Here are a few:
The sensor: In film cameras a light sensitive film is situated behind the lens. To take a photo the shutter opens for a predetermined period of time and light hits the film "printing" a photo on the film. After a photo is taken the film is rolled and a fresh film is placed behind the lens. In digital cameras an electronic sensor (known as CCD) is situated behind the lens. The CCD is comprised of many tiny light sensitive sensors one per pixel. To take a photo the shutter opens for a predetermined period of time and light hits the sensor. Each pixel gets its value and together all the pixels comprise one photo. The photo is saved on a digital media and the CCD is electronically emptied.
The main difference between a CCD sensor and a film is the Depth of Field. Since digital sensors are smaller than 35mm film the depth of field is much bigger in fact in most compact digital cameras it is almost infinite.
Instant feedback: One of great features digital cameras is instant feedback. Digital cameras include a small LCD screen. After a photo is shot it can be viewed on that screen. If the photo is not good you can take another one. The ability to view the photos helps in making an educated decision on how to fix it or how to compose it better. It takes much of the guessing out of photography.
Photo capacity: Digital cameras today can hold hundreds and even thousands of digital photos on a single media. With extra storage media in your pocket digital cameras have virtually infinite capacity. On the other hand film cameras' capacity is very limited. The standard is a roll of 36 photos which can hold only 36 photos. After such a roll is used changing to a new roll takes time and is not easy to do in scenarios such as darkness or a harsh environment. Rolls of film are not small and carrying rolls equivalent of thousands of photos is not practical.
Shooting angles: Digital cameras allow you to take photos without having your eye glued to the viewfinder. Combined with the virtually zero cost of taking photos and high capacity this means new opportunities for new shooting angles.
A photo cost: Photos taken with a digital camera really cost nothing. They are saved on erasable memory and thus can always be freely discarded. The photos that you decide to keep can be copied to digital media such as a computer's hard disk. With low digital storage prices the cost of storing one photo is practically zero. Film does cost money. A roll of film costs money and can not be reused. Every time that the shutter button is pressed money is spent regardless if you later on decide to discard them.
Photo processing: Digital cameras photos are basically computer files and can be manipulated by computer software. Such software is known as photo processing software and allows you to correct photos and create special effects. Some photo processing abilities are built-in cameras. With film on the other hand it is very hard to make corrections. If corrections are absolutely needed the easiest way to do them is to scan the negative or the printed photo (i.e. converted to digital) and process it on a computer as if it was a digital camera photo.
Adapting to different conditions: Rolls of film are designed for specific scenarios There are indoor and outdoor films or films with different light sensitivity. When conditions change a film camera photographer will have to shoot with the wrong film, change the roll (and lose the remainder photos) or use another camera with a different roll in it. Shooting photos with the wrong roll of film can result in distorted colors (reddish photos for example), a grainy photo and more.
With digital cameras on the other hand the characteristics of the sensor can be electronically set. With a click of a button the camera can change to indoor or outdoor mode, low light, night photography and so on.
About the Author
This article can be reprinted as long as the resource box including the backlink is included. You can find more information on digital photo printing and photography in general on printrates.com - a site dedicated to digital photo prints Ziv Haparnas writes about practical technology issues. Ziv Haparnas is a veteran technologist.
Disclamer:
The opinions expressed by authors in this blog are their own and in no way represent the opinions of the owner and or administrator of molophoto blog. Molophoto bears no responsibility for any opinion expressed by any contributing author and or article.
Sunday, August 31, 2008
Saturday, August 30, 2008
into the sun
 Exif
ExifCamera Model: Canon 400D
Shutter Speed: 1/320 sec.
Lens Aperture: F/8
ISO: 100
Focal Length: 10mm
Exposure Program: Aperture Priority
Friday, August 29, 2008
A holistic approach to buying a new digital camera
by Ziv Haparnas
Many buy a new camera based on just a few parameters like purchase price and megapixels. This is unfortunate as there is much more to a new digital camera buying decision. This article will describe a holistic approach to that decision.
In the early days of the digital camera era buying a new camera was relatively an easy decision. Digital cameras did not have many options and checking simple things like price and the number of megapixels was enough. Since then however digital cameras have evolved and became more sophisticated. They have many new features and options. They can work with different accessories and use different technologies. Today when making a decision on a new digital camera a holistic approach that takes the different features and options into account is more suitable.
So what does it take to make a decision on a brand new digital camera? Following is a breakdown of what to check for when buying one. This list is not complete and you should use it as a guide to understanding the complexity of choosing a digital camera.
Cost:
Do not confuse cost with purchase price. Purchase price is what you pay to buy the camera. Cost is the total money you need to spend including the purchase price in order to effectively use the camera. In most cases you will spend additional money on accessories and other additional products such as lenses, batteries, carrying cases and more. Failing to budget for those extra expenses can result in buying a camera just to find out it can not be effectively used without spending more.
User knowledge:
It is important to buy a digital camera that is appropriate for its user's photography level. If you are technology and photography savvy you can consider higher end cameras that allow more flexibility and manual options but are harder to use. Digital SLR cameras fall into that category. If you are not into photography or technology you might want to choose a camera that is easier to use such as a digital point a shoot one.
Expected usage:
The digital camera you choose should be appropriate for its intended use. For example if you travel a lot for long periods of time you want to pay attention to features such as camera weight, size, battery life and memory storage. On the other hand if you hardly travel at all these features are less important.
Basic features:
There are some basic features that are common to most if not all digital cameras. These features are:
# ^Megapixels: you can not avoid the number of megapixels question. Is more megapixels better? It really depends. More megapixels is important if you are going to print photos and enlargements or if you are going to zoom in and crop photos. However if you plan to view the photos on your computer screen and occasionally print 4X6 copies then 2 or 3 megapixels is more than enough. Buying a digital camera with more megapixels is not a drawback but you should make sure that you could not have used the extra money spent on megapixels for other features that are more useful to you.
# ^Batteries: Digital cameras use two kind of batteries disposable or rechargeable. Disposable batteries are easy to buy, carry and replace. They are available in any store and are very convenient when traveling. Disposable batteries however are more costly to use as you need to keep buying new batteries. Rechargeable batteries require only one purchase. However if they are empty during a photo shooting session or somewhere away from home or a power supply you can not just buy another battery. Take into account the cost of extra batteries based on the expected digital camera usage.
# ^Zoom: There are two types of zoom – optical and digital. Optical zoom works by physically moving the camera's lenses and changing the focal length. Digital zoom works by applying built-in software in the camera to define a portion of interest in the photo. Once chosen the software crops the rest of the photo and enlarges the area you chose. For quality and other reasons optical zoom is superior to digital zoom. From a practical point of view digital zoom should not be considered zoom at all. When you compare different digital cameras zoom figures always compare their optical zoom capabilities. You should ignore the digital zoom figures.
Accessories:
Digital cameras can use a large number of accessories. You should be aware of what accessories are supported by your camera and which accessories you deem important to you. These should be taken into account in your buying decision. Some of the common accessories to consider:
# ^Memory cards: Digital cameras store photos as files on a memory device usually a removable memory card. Most digital cameras are sold with a very small memory card. This lowers their purchase price. Such a small memory card can hold a small number of photos and is not practical. When buying a digital camera always check how much memory is included. Then assess how much memory you will need and check the prices of memory cards appropriate for you. Add this cost to the total cost of buying the new digital camera.
# ^PC connectivity: Digital cameras connect to computers in order to download photos. The most common methods of connectivity are USB and plugging the camera's memory card directly to the PC. Make sure that your camera includes the USB cable needed to connect to the PC. If you prefer connecting the removable memory directly to your PC budget an adaptor that can bridge between the memory card and the slots available in your PC.
# ^Lenses: High-end digital cameras such as digital SLR often require additional lenses. When reviewing your camera check what lenses are included with the camera. If you need more lenses shop around for ones that fit your camera and budget their price. Lenses can be very expensive and can cost more than the camera itself. For example when buying an SLR camera for outdoor photography that requires zoom lenses make sure you budget such lenses that fit the camera you plan to buy.
# ^External Flash: Most likely that you will not need to buy an external flash unit. If do need an external flash in addition to your camera's built-in one make sure that you shop for one that can work with the camera and budget its cost before purchasing the camera. External flash units prices can vary and can be a costly addition.
About the Author
Ziv Haparnas is an expert technology writer. Ziv Haparnas writes about science and technology. Information about photography and photo prints is on printrates.com - your home for digital photo printing This article can be published and used as long as the resource box including the backlink is included.
Disclamer:
The opinions expressed by authors in this blog are their own and in no way represent the opinions of the owner and or administrator of molophoto blog. Molophoto bears no responsibility for any opinion expressed by any contributing author and or article.
Thursday, August 28, 2008
circle of light
 Exif
ExifCamera Model: Canon 400D
Shutter Speed: 1/2 sec.
Lens Aperture: F/8
ISO: 100
Focal Length: 12mm
Exposure Program: Manual
Wednesday, August 27, 2008
A common photography problem: underexposed digital photos
by Ziv Haparnas
Digital cameras are becoming more and more sophisticated. On one hand they allow high quality automatic point and shoot. On the other hand they allow full manual control of their settings. Regardless of the mode you use there are some scenes that require special care. Without such care your digital photos will be of poor quality regardless of how sophisticated and automatic your camera is.
New digital cameras include sophisticated hardware and software that allow a simple point a shoot usage and result in high quality digital photos. Such high quality digital photos are achieved in most scenarios but in some scenarios solely relying on the cameras automatic feature is not enough. In such scenes the camera hardware and software will make the wrong decision as to the optimal camera setting for the best digital photo. The result will be a poor quality photo.
Being aware of such scenarios can help in avoiding such poor quality digital photos. When you identify such a scenario you can use some simple techniques, by manually setting the camera, by changing the photo shooting angle or by manipulating the scene.
One of the common problems with automatic digital camera photo shooting is digital photos that are underexposed. Underexposed digital photos look dark and lack details. Their color is not rich and the objects tend to look grayish and not "alive". The reason for underexposed photos is setting the exposure too low. Although the camera can measure ambient light and make the exposure decisions for you it can be confused by scenes that are more complex. Many times such scenes do not really have one perfect exposure setting and the best exposure depends on the results and the objects in the scene that you care about the most.
For example if there is a very bright light source in the photo it can confuse the camera to believe that there is enough light in the scene for a low exposure setting. The result will be a photo that captures the bright area but darkens all the others. Usually you can assume that scenes that have extreme lighting gaps between different areas confuse the camera – for example if a quarter of the photo is very bright and the rest is very dark the camera is likely to set the wrong exposure. When you identify such cases you can manually set the exposure to the right value for the results you are looking for. Another options is to pan the camera a bit and point to a scene that does not have such light gaps (for example that does not have a very bright object in it) but that its objects are in the same focus distance as the scene you are planning to shoot. At that point you can press the shutter half way down (or use any other specific camera mechanism) in order to lock the camera focus and exposure settings. Once you have done that you can pan the camera back to the original scene and shoot the photo.
The best way to learn how to avoid underexposed digital photos is by experimenting and practicing. Try to find scenes that will confuse the digital camera into taking underexposed digital photos. Take a few digital photos using the camera automatic mode and review the results confirming the expected poor quality. Now correct the problem and take a few more photos. Review the new digital photos and make sure that indeed the underexposed digital photos problem is gone. Practicing in a controlled environment will help you be prepared to quickly and efficiently handle such scenes in real time photo shooting.
About the Author
This article can be reprinted only if the resource box including the backlink is included. Information about photography and photo prints is on printrates.com - your home for digital photo print service Ziv Haparnas is an expert technology writer.
Disclamer:
The opinions expressed by authors in this blog are their own and in no way represent the opinions of the owner and or administrator of molophoto blog. Molophoto bears no responsibility for any opinion expressed by any contributing author and or article.
Tuesday, August 26, 2008
white shade
 Exif
ExifCamera Model: Canon 400D
Shutter Speed: 1/100 sec.
Lens Aperture: F/9
ISO: 400
Focal Length: 20mm
Exposure Program: Aperture Priority
Monday, August 25, 2008
A common photography problem: Shaded objects in digital photos
by Ziv Haparnas
Digital cameras are becoming more and more sophisticated. On one hand they allow high quality automatic point and shoot. On the other hand they allow full manual control of their settings. Regardless of the mode you use there are some scenes that require special care. Without such care your digital photos will be of poor quality regardless of how sophisticated and automatic your camera is.
New digital cameras include sophisticated hardware and software that allow a simple point a shoot usage and result in high quality digital photos. Such high quality digital photos are achieved in most scenarios but in some scenarios solely relying on the cameras automatic feature is not enough. In such scenes the camera hardware and software will make the wrong decision as to the optimal camera setting for the best digital photo. The result will be a poor quality photo.
Being aware of such scenarios can help in avoiding such poor quality digital photos. When you identify such a scenario you can use some simple techniques, by manually setting the camera, by changing the photo shooting angle or by manipulating the scene.
One of the common problems with automatic digital camera photo shooting is shaded objects in digital photos. A good example of shaded objects in digital photos is when taking a portrait photo in daylight. The digital camera ambient light sensor measures enough light to set a relatively low exposure value. But even scenes with that have enough ambient light can result in shades that appear on the object depending on the angle of the light source relative to the object. For example if the object is a person with his face lit from the side the object's nose can create shades. Another example is if the object is a person that is wearing a hat and is lit from a light source above – in such a scene the hat can create shades on the object's face.
The camera can not automatically identify such problems and correct them. One way to easily eliminate the shades on the objects is by using the camera fill-in flash. Turn the fill-in flash on. When taking a photo the fill-in flash will fire and will light the shaded areas on the object. One limitation of this solution is that the objects must be within the fill-in flash effective range. Otherwise the flash light will fail to light the object and the shades will not be lit.
The best way to learn how to avoid Shaded objects in digital photos is by experimenting and practicing. Try to find scenes that will confuse the digital camera into taking digital photos with Shaded objects. Take a few digital photos using the camera automatic mode and review the results confirming the expected poor quality. Now correct the problem and take a few more photos. Review the new digital photos and make sure that indeed the Shaded objects problem is gone. Practicing in a controlled environment will help you be prepared to quickly and efficiently handle such scenes in real time photo shooting.
About the Author
Ziv Haparnas is an expert technology writer. More information on digital photo printing and photography is available on printrates.com - a site about digital prints This article can be published as long as the resource box including the backlink is included. Mr. Haparnas writes about science and technology.
Disclamer:
The opinions expressed by authors in this blog are their own and in no way represent the opinions of the owner and or administrator of molophoto blog. Molophoto bears no responsibility for any opinion expressed by any contributing author and or article.
Sunday, August 24, 2008
alone
 Exif
ExifCamera Model: Canon 400D
Shutter Speed: 1/4000 sec.
Lens Aperture: F/5.6
ISO: 400
Focal Length: 105mm
Exposure Program: Manual
Saturday, August 23, 2008
A common photography problem: red eyed objects in digital photos
by Ziv Haparnas
Digital cameras are becoming more and more sophisticated. On one hand they allow high quality automatic point and shoot. On the other hand they allow full manual control of their settings. Regardless of the mode you use there are some scenes that require special care. Without such care your digital photos will be of poor quality regardless of how sophisticated and automatic your camera is.
New digital cameras include sophisticated hardware and software that allow a simple point a shoot usage and result in high quality digital photos. Such high quality digital photos are achieved in most scenarios but in some scenarios solely relying on the cameras automatic feature is not enough. In such scenes the camera hardware and software will make the wrong decision as to the optimal camera setting for the best digital photo. The result will be a poor quality photo.
Being aware of such scenarios can help in avoiding such poor quality digital photos. When you identify such a scenario you can use some simple techniques, by manually setting the camera, by changing the photo shooting angle or by manipulating the scene.
One of the common problems with automatic digital camera photo shooting is digital photos that have objects with red eyes in them. Red eyed objects in digital photos is a very common phenomenon. It is usually common when taking digital photos of people or animals and using a flash in a dark environment. The eyes of objects in such digital photos have some red glow in them. The reason for the redness in their eyes is light that is reflected from the blood rich back of the eye. There are a few things that you can do to prevent red-eyes: some cameras support a "red eye reduction" mode. In that mode the camera fires the flash a few times before taking the photo. Although this can help reducing red-eye it can also result in photos of people with their eyes closed (as they are blinded by the pre-flash their reflex is to close their eyes). Other ways to prevent red-eye is to use bounce flash (you can do that with special equipment or for example by pointing the flash to a white wall) and using more ambient light if possible (for example by turning on all the lights in the room). Some cameras include built-in image processing software that automatically removes red-eye from the photos or alternatively you can use many software packages on your home computer to accomplish the same.
The best way to learn how to avoid red eyed objects in digital photos is by experimenting and practicing. Try to find scenes that will confuse the digital camera into taking digital photos with red eyed objects. Take a few digital photos using the camera automatic mode and review the results confirming the expected poor quality. Now correct the problem and take a few more photos. Review the new digital photos and make sure that indeed the red eyed objects are in the digital photos. Practicing in a controlled environment will help you be prepared to quickly and efficiently handle such scenes in real time photo shooting.
About the Author
More information on digital photo printing and photography is available on printrates.com - a site about digital photo print service Ziv Haparnas writes about practical technology and science issues. Ziv Haparnas is an expert technology writer. This article can be published only if the resource box including the backlink is included.
Disclamer:
The opinions expressed by authors in this blog are their own and in no way represent the opinions of the owner and or administrator of molophoto blog. Molophoto bears no responsibility for any opinion expressed by any contributing author and or article.
Friday, August 22, 2008
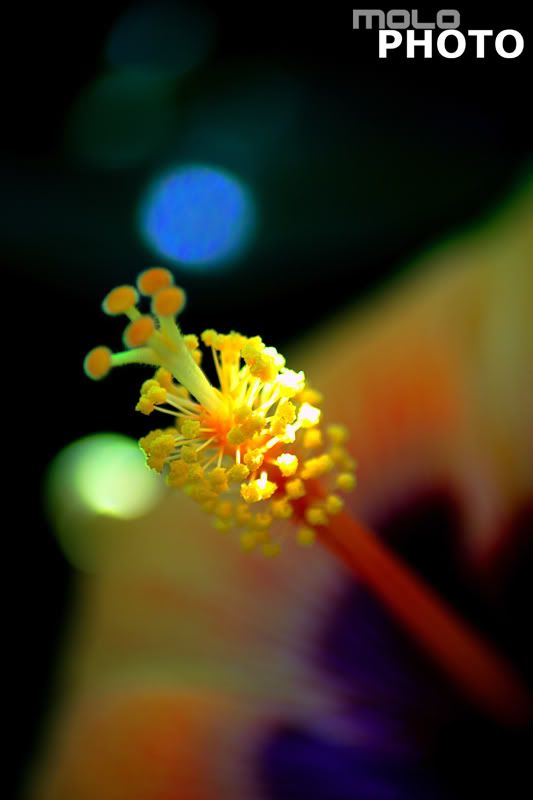
friend or foe
 Exif
ExifCamera Model: Canon 400D
Shutter Speed: 1/100 sec.
Lens Aperture: F/5.6
ISO: 800
Focal Length: 62mm
Exposure Program: Aperture Priority
Thursday, August 21, 2008
A common photography problem: overexposed digital photos
by Ziv Haparnas
Digital cameras are becoming more and more sophisticated. On one hand they allow high quality automatic point and shoot. On the other hand they allow full manual control of their settings. Regardless of the mode you use there are some scenes that require special care. Without such care your digital photos will be of poor quality regardless of how sophisticated and automatic your camera is.
New digital cameras include sophisticated hardware and software that allow a simple point a shoot usage and result in high quality digital photos. Such high quality digital photos are achieved in most scenarios but in some scenarios solely relying on the cameras automatic feature is not enough. In such scenes the camera hardware and software will make the wrong decision as to the optimal camera setting for the best digital photo. The result will be a poor quality photo.
Being aware of such scenarios can help in avoiding such poor quality digital photos. When you identify such a scenario you can use some simple techniques, by manually setting the camera, by changing the photo shooting angle or by manipulating the scene.
One of the common problems with automatic digital camera photo shooting is digital photos that are overexposed. Overexposed digital photos have blown out areas and sometimes are completely saturated and white. Their color is not rich and the objects tend to look white and not "alive". The reason for overexposed photos is setting the exposure too low. Although the camera can measure ambient light and make the exposure decisions for you it can be confused by scenes that are more complex. Many times such scenes do not really have one perfect exposure setting and the best exposure depends on the results and the objects in the scene that you care about the most.
For example if there is a very bright light source in the photo it can confuse the camera to believe that there is enough light in the scene for a low exposure setting. The result will be a photo that captures the bright area but darkens all the others. Usually you can assume that scenes that have extreme lighting gaps between different areas confuse the camera – for example if a quarter of the photo is very bright and the rest is very dark the camera is likely to set the wrong exposure. When you identify such cases you can manually set the exposure to the right value for the results you are looking for. Another options is to pan the camera a bit and point to a scene that does not have such light gaps (for example that does not have a very bright object in it) but that its objects are in the same focus distance as the scene you are planning to shoot. At that point you can press the shutter half way down (or use any other specific camera mechanism) in order to lock the camera focus and exposure settings. Once you have done that you can pan the camera back to the original scene and shoot the photo.
The best way to learn how to avoid overexposed digital photos is by experimenting and practicing. Try to find scenes that will confuse the digital camera into taking overexposed digital photos. Take a few digital photos using the camera automatic mode and review the results confirming the expected poor quality. Now correct the problem and take a few more photos. Review the new digital photos and make sure that indeed the overexposed digital photos problem is gone. Practicing in a controlled environment will help you be prepared to quickly and efficiently handle such scenes in real time photo shooting.A common photography problem: shaded objects in digital photos
About the Author
Information about photography and photo prints is on printrates.com - your home for digital photo printing Ziv Haparnas is an expert in technology. This article can be published and used as long as the resource box including the backlink is included. Mr. Haparnas writes about practical technology and science issues.
Disclamer:
The opinions expressed by authors in this blog are their own and in no way represent the opinions of the owner and or administrator of molophoto blog. Molophoto bears no responsibility for any opinion expressed by any contributing author and or article.
Wednesday, August 20, 2008
zoom
 Exif
ExifCamera Model: Canon 400D
Shutter Speed: 1/250 sec.
Lens Aperture: F/5
ISO: 200
Focal Length: 192mm
Exposure Program: Aperture Priority
Tuesday, August 19, 2008
A common photography problem: out of focus digital photos
by Ziv Haparnas
Digital cameras are becoming more and more sophisticated. On one hand they allow high quality automatic point and shoot. On the other hand they allow full manual control of their settings. Regardless of the mode you use there are some scenes that require special care. Without such care your digital photos will be of poor quality regardless of how sophisticated and automatic your camera is.
New digital cameras include sophisticated hardware and software that allow a simple point a shoot usage and result in high quality digital photos. Such high quality digital photos are achieved in most scenarios but in some scenarios solely relying on the cameras automatic feature is not enough. In such scenes the camera hardware and software will make the wrong decision as to the optimal camera setting for the best digital photo. The result will be a poor quality photo.
Being aware of such scenarios can help in avoiding such poor quality digital photos. When you identify such a scenario you can use some simple techniques, by manually setting the camera, by changing the photo shooting angle or by manipulating the scene.
One of the common problems with automatic digital camera photo shooting is digital photos that are out of focus. An out of focus photo looks blurry and has low contrast. Usually such a photo is useless and there is no way to correct it using software on your home computer. Most digital cameras can automatically set the focus for you and in most cases they choose the right focus for the scene. Some scenes however are harder to focus on and can fool even the most sophisticated high-end digital camera's auto focus mechanism. Moreover with most digital cameras excluding digital SLRs you can not really confirm the focus quality. The reason is that the viewfinder is not connected to the actual lenses and the preview LCD screen is too small to really allow correct focus appreciation.
If you are using an SLR camera you can make sure that the objects are in focus by looking through the viewfinder. Most cameras sound a short beep when the focus is locked and also display a green rectangle around the area that they focused on. The first step to ensure correct focus is to make sure that this area is where the objects that you care about are. For example if there are two objects in the scene in different distances from the camera make sure that the camera focused on the object you want.
Extreme scenes are be harder to focus on. For example scenes that include a few objects that are very close to the camera and a few that are far or scenes that simply include very close objects. Such scenarios take special care to focus on. If your camera allows manual focus – try to manually focus to make sure that you got the desired focus. In any case when you identify a potential focus problem take more digital photos than you would usually take while changing the focus settings, taking a few in manual mode and a few in automatic mode, changing the shooting angle and the distance from the objects if possible.
The best way to learn how to avoid out of focus digital photos is by experimenting and practicing. Try to find scenes that will confuse the digital camera into taking out of focus digital photos. Take a few digital photos using the camera automatic mode and review the results confirming the expected poor quality. Now correct the problem and take a few more photos. Review the new digital photos and make sure that indeed the out of focus problem is gone. Practicing in a controlled environment will help you be prepared to quickly and efficiently handle such scenes in real time photo shooting.
About the Author
Ziv Haparnas is a technology expoert. Ziv Haparnas writes about practical technology issues. Information about photography and photo prints is on printrates.com - your home for Sony and digital printing This article can be reprinted and used as long as the resource box including the backlink is included.
Disclamer:
The opinions expressed by authors in this blog are their own and in no way represent the opinions of the owner and or administrator of molophoto blog. Molophoto bears no responsibility for any opinion expressed by any contributing author and or article.
Monday, August 18, 2008
feel
 Exif
ExifCamera Model: Canon 400D
Shutter Speed: 1/100 sec.
Lens Aperture: F/10
ISO: 800
Focal Length: 300mm
Exposure Program: Aperture Priority
Sunday, August 17, 2008
tip
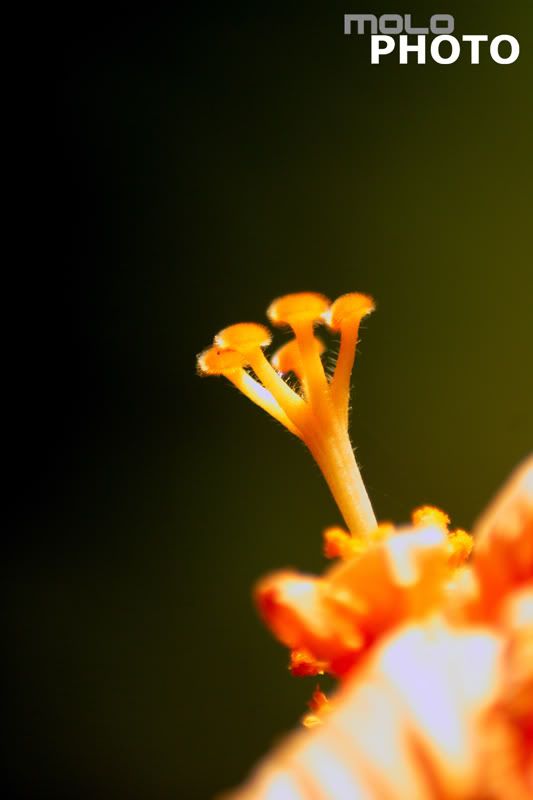 Exif
ExifCamera Model: Canon 400D
Shutter Speed: 1/500 sec.
Lens Aperture: F/6.3
ISO: 100
Focal Length: 300mm
Exposure Program: Aperture Priority
Saturday, August 16, 2008
A common photography problem: dark silhouettes in digital photos
by Ziv Haparnas
Digital cameras are becoming more and more sophisticated. On one hand they allow high quality automatic point and shoot. On the other hand they allow full manual control of their settings. Regardless of the mode you use there are some scenes that require special care. Without such care your digital photos will be of poor quality regardless of how sophisticated and automatic your camera is.
New digital cameras include sophisticated hardware and software that allow a simple point a shoot usage and result in high quality digital photos. Such high quality digital photos are achieved in most scenarios but in some scenarios solely relying on the cameras automatic feature is not enough. In such scenes the camera hardware and software will make the wrong decision as to the optimal camera setting for the best digital photo. The result will be a poor quality photo.
Being aware of such scenarios can help in avoiding such poor quality digital photos. When you identify such a scenario you can use some simple techniques, by manually setting the camera, by changing the photo shooting angle or by manipulating the scene.
One of the common problems with automatic digital camera photo shooting is digital photos that include dark silhouettes in them. Dark Silhouettes appear when you are taking digital photos in a scene with a bright light source behind the object. An example of such a scene is when the sun is behind the object. The result will be a digital photo that includes a dark silhouette of the object. One scene that is very likely to result in such a problem is when taking a photo of someone on the beach against a sunset. The result will be a dark silhouette of the person with a good photo of the sunset in the background. Dark silhouettes are a result of the camera setting the wrong exposure. Because of the bright background the camera sets a low exposure and the object that are not lit from their front are severely underexposed.
The dark silhouettes in the digital photo can be eliminated by simply using the camera's fill-in flash. When taking a photo with the fill-in flash turned on the flash lights the object making sure that it is captured with all its details. Use a fill-in flash when taking pictures of objects with a bright light source behind them. One limitation of this solution is that the objects must be within the flash effective range – otherwise the flash is useless and they will still appear as silhouettes in the photo.
The best way to learn how to avoid dark silhouettes in digital photos is by experimenting and practicing. Try to find scenes that will confuse the digital camera into taking dark silhouettes digital photos. Take a few digital photos using the camera automatic mode and review the results confirming the expected poor quality. Now correct the problem and take a few more photos. Review the new digital photos and make sure that indeed the dark silhouettes problem is gone. Practicing in a controlled environment will help you be prepared to quickly and efficiently handle such scenes in real time photo shooting.
About the Author
Mr. Haparnas writes about science and technology. Ziv Haparnas is an expert technology writer. Information about photography and photo prints is on printrates.com - your home for Canon and digital cameras This article can be reprinted and used as long as the resource box including the backlink is included.
Disclamer:
The opinions expressed by authors in this blog are their own and in no way represent the opinions of the owner and or administrator of molophoto blog. Molophoto bears no responsibility for any opinion expressed by any contributing author and or article.
Friday, August 15, 2008
blue cotton
 Exif
ExifCamera Model: Canon 400D
Shutter Speed: 1/15 sec.
Lens Aperture: F/5.6
ISO: 100
Focal Length: 18mm
Exposure Program: Aperture Priority
Thursday, August 14, 2008
A common photography problem: blurry digital photos
by Ziv Haparnas
Digital cameras are becoming more and more sophisticated. On one hand they allow high quality automatic point and shoot. On the other hand they allow full manual control of their settings. Regardless of the mode you use there are some scenes that require special care. Without such care your digital photos will be of poor quality regardless of how sophisticated and automatic your camera is.
New digital cameras include sophisticated hardware and software that allow a simple point a shoot usage and result in high quality digital photos. Such high quality digital photos are achieved in most scenarios but in some scenarios solely relying on the cameras automatic feature is not enough. In such scenes the camera hardware and software will make the wrong decision as to the optimal camera setting for the best digital photo. The result will be a poor quality photo.
Being aware of such scenarios can help in avoiding such poor quality digital photos. When you identify such a scenario you can use some simple techniques, by manually setting the camera, by changing the photo shooting angle or by manipulating the scene.
One of the common problems with automatic digital camera photo shooting is digital photos that are blurry. Blurry digital photos look out of focus or have objects that are not clear and appear to be smudged. Most of the blurry digital photos are the result of camera shakings. When the shutter is open and the scene is captured on the digital camera sensor (also known as CCD) any shakings or movements of the digital camera will result in the objects moving around the CCD while the photo capturing process is executed. The result of such movements is a blurry photo since the object seems to be "captured" by a few areas on the CCD in different intensities.
Learn how to hold your digital camera to minimize shakings: it should be held firmly with two hands and it should "touch" your face. Camera shakings and movements are more problematic when shooting in extreme conditions such as slow shutter speeds or very high zoom values. With slow shutter speed the camera has more time to "move" and blur the photo. With high zoom value even very small camera movements that would otherwise not be noticeable are enlarged and blur the digital photo. If you are shooting photos using slow shutter speeds or high zoom values you should use a sturdy tripod to prevent shaking. If you can not guarantee that the camera will be stable – for example if you are shooting while you're moving – set the camera to shutter priority and choose a fast shutter speed (assuming of course that the light conditions allow such setting) – for example setting the shutter speed to anything faster than 1/250 of a second will most likely guarantee a non blurry photo even if the camera shakes a bit. If you have to take high zoom value digital photos without a tripod or a sturdy surface you can also consider using high end lenses that include built-in image stabilizers.
The best way to learn how to avoid blurry digital photos is by experimenting and practicing. Try to find scenes that will confuse the digital camera into taking blurry digital photos. Take a few digital photos using the camera automatic mode and review the results confirming the expected poor quality. Now correct the problem and take a few more photos. Review the new digital photos and make sure that indeed the blurry digital photos problem is gone. Practicing in a controlled environment will help you be prepared to quickly and efficiently handle such scenes in real time photo shooting.
About the Author
More information on digital photo printing and photography is available on printrates.com - a site about Canon and photo printing This article can be reprinted as long as the resource box including the backlink is included. Ziv Haparnas is a technology veteran.
Disclamer:
The opinions expressed by authors in this blog are their own and in no way represent the opinions of the owner and or administrator of molophoto blog. Molophoto bears no responsibility for any opinion expressed by any contributing author and or article.
Wednesday, August 13, 2008
ring
 Exif
ExifCamera Model: Canon 400D
Shutter Speed: 1/40 sec.
Lens Aperture: F/5.6
ISO: 100
Focal Length: 55mm
Exposure Program: Aperture Priority
Tuesday, August 12, 2008
tears from heaven
 Exif
ExifCamera Model: Canon 400D
Shutter Speed: 1/200 sec.
Lens Aperture: F/5.6
ISO: 400
Focal Length: 55mm
Exposure Program: Shutter Priority
Description:
I saw this water droplet after a light rain.
Monday, August 11, 2008
sunset swimmers
 Exif
ExifCamera Model: Canon 400D
Shutter Speed: 1/500 sec.
Lens Aperture: F/5.6
ISO: 100
Focal Length: 55mm
Exposure Program: Aperture Priority
Description:
Sunday, August 10, 2008
coral
 Exif
ExifCamera Model: Canon 400D
Shutter Speed: 1/160 sec.
Lens Aperture: F/5.6
ISO: 100
Focal Length: 49mm
Exposure Program: Aperture Priority
Saturday, August 9, 2008
blue sunset
 Exif
ExifCamera Model: Canon 400D
Shutter Speed: 1/80 sec.
Lens Aperture: F/4
ISO: 400
Focal Length: 27mm
Exposure Program: Manual
Description:
Shot during sunset in Boracay.
Friday, August 8, 2008
rolling clouds
 Exif
ExifCamera Model: Canon 400D
Shutter Speed: 1/125 sec.
Lens Aperture: F/8
ISO: 200
Focal Length: 18mm
Exposure Program: Manual
Description:
Sunset during our last visit to Boracay.
Boracay is in Caticlan, Panay Island, Philippines.
Thursday, August 7, 2008
Seconnd cup?
 Exif
ExifCamera Model: Canon 400D
Shutter Speed: 6 sec.
Lens Aperture: F/3.5
ISO: 200
Focal Length: 18mm
Exposure Program: Shutter Priority
Why not? This was taken when we were waiting for one of our friend to come down at his office.
Wednesday, August 6, 2008
water rainbow

Exif
Camera Model: Canon 400D
Shutter Speed: 0.6 sec.
Lens Aperture: F/8
ISO: 1600
Focal Length: 18mm
Taken at Intercontinental Hotel - Festival City, Dubai, United Arab Emirates.
Tuesday, August 5, 2008
what`s behind the bush?
 Exif
ExifCamera Model: Canon 400D
Shutter Speed: 1/160 sec.
Lens Aperture: F/5.6
ISO: 100
Focal Length: 105mm
Exposure Program: Aperture Priority
Metering Mode: Average
Taken at Al Mamzar Park, Dubai, United Arab Emirates.
Mamzar Park is located on the nothern outskirts of Dubai. The park offers long stretch beach which i highly recommend for beach lovers. It is also a great place for family picnic and barbeque.
Monday, August 4, 2008
ugto-ugto
 Exif
ExifCamera Model: Canon 400D
Shutter Speed: 1/160 sec.
Lens Aperture: F/10
ISO: 800
Focal Length: 300mm
Exposure Program: Aperture Priority
The web is an essential part of the image hence the small aperture of f/10 was used to caputre the spider web.
Sunday, August 3, 2008
Green veins
 Exif
ExifCamera Model: Canon 400D
Shutter Speed: 1/1250 sec.
Lens Aperture: F/5.6
ISO: 800
Focal Length: 300mm
Exposure Program: Aperture Priority
Backlighting was the main factor to get the veins of the leaf in the picture.
Saturday, August 2, 2008
Boracay panoramic sunset

Exif
Camera Model: Canon 400D
This shot was stitched from two photos inorder to accomplish the panoramic scene in Boracay.
Boracay is a tropical island located approximately 315km (200 miles) south of Manila and 2km off the northwest tip of the island of Panay in the Western Visayas region of the Philippines. It is one of the country's most popular tourist destinations. The island comprises the barangays of Manoc-Manoc, Balabag, and Yapak (3 of the 17 barangays which make up the municipality of Malay), and is under the administrative control of the Philippine Tourism Authority in coordination with the Provincial Government of Aklan. - http://en.wikipedia.org/wiki/Boracay
Subscribe to:
Comments (Atom)


